Top Borders
Divider
This is the second in a series of tutorials using PaintShopPro 5. To do this tutorial exactly as it is shown you will need the Blade Pro filters. You can download the set for a free trial of 15 days at which time you will need to register them. If you do not want to go to the expense (although at $29 a real bargain) you can still follow the lesson and use either a solid color or apply your own special effects. This tutorial or lesson is longer then any others I done so it might load a little slower, although I have divided it into three seperate pages.

Step #1

From either the Menu Bar or the Tool Bar select a new image. Width at 250 Height at 100 (the larger size is needed when we get to the edit phase) set the background to white and 16.7 million colors.

topbord1

Step #2

Now from the Menu Bar select Image, Plugin Filters and go the the directory that contains your Blade Pro Filters (Flaming Pear/BladePro).

topbord2

Step #3

Now you should get a screen that looks like the one below.

topbord3
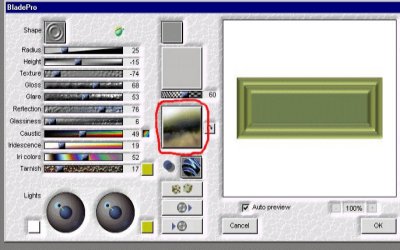
First thing click on the Shapes button and select the third from the bottom.

topbord5a

Set the following; Radius=25, Height=-15, Texture=-74, Gloss=68, Glare=53, Reflection=76, Glassiness=6, Caustic=49, Iridescence=19, Iris Color=52 and Tarnish=17.
Set the first color button at the end of the Tarnish Bar to Hue=43, Saturation=255, Light=96. Set the first Lights color button to Hue=0, Saturation=0 Light=255. Set the second Lights color button to the Hue=43, Saturation=255, Light=96.
Now be sure the top two boxes in the middle of the screen are shaded in gray with out any texture (little box a darker gray then the larger one) and set the slide bar to 60.
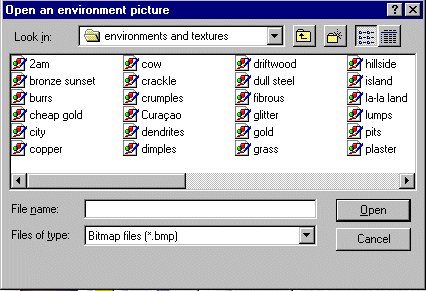
Click on the button I have circled in red. Go to the directory that contains all of your plugins. Find the folder titled Environment and Textures. Open the folder and select the cheap gold.

topbord4

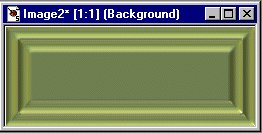
Finally say OK. Your image should look much like the one found below.

topbord6

Go To Next Page