Blade Pro Filters comes with quite a few PreSets for you to start working with. This are located in the environment and texture folder. You may be thinking that there is "no way am I going to be able to do this" when you first look at the BladePro Control Panel. Where in reality it is a very user friendly interface.
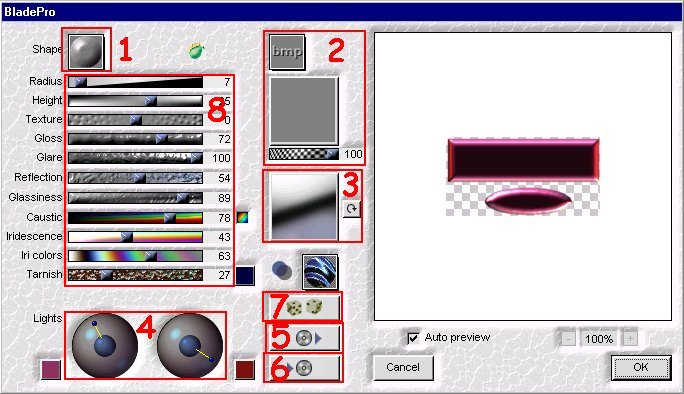
1.
This will allow you to select any one of the thirteen (13) button shapes provided.

2.
The small box is your access to the twelve (12) built-in textures, whereas the larger box will give you access to the textures in the environment and texture folder.

3.
This box will also give you access to the environment and texture folder. Here you would use the colored BMP files.
4.little
The two circles are used to obtain the desired highlighting you want. Simply move the lines with the little blue balls to change the lighting on your image.
5.
This is where you will get the presets. The button that appears to be a CD opens the environment and texture folder and access the q9q files. These are all the settings that give you the actual effect. They contain the button selection,texture if any the colored BMP and all the settings of the scroll bars on the left along with the lighting effect.
6.
This CD button is where you will save any presets you create. It will automatically save the file as a q9q type along with all the settings you choose. One piece of advice save the effect once you get what you like because you probably will not be able to reproduce it. How ever if you should leave Blade Pro and come back at a later time the last setting will still be the active ones.
7.
This button with the dices will do exactly what it says it will, randomly change the effects on the selected image.
8.
Finally you can change the appearance of the effect by playing with these different slide or scroll bars.
I hope this helps a little to enlighten you on how easy BladePro is to use and at $49 it is well worth it. So all you need to do to create your own PerSets is to simple select an existing q9q file by clicking on the CD button I have numbered five (5) and then start to modify it by selecting a different texture, colored BMP, change the setting on the eleven (11) slide bars and move the lighting around. Once you see the different effects you can create you might want to also create some colored BMP's and save them in the environment and texture folder. This can be done by adding colored photos (make sure you don't infringe on copyrights) or create your own colored BMP's. I have a few I done with EyeCandy.
Now go have fun and create some PreSets of your own.